In the world of business, having a professional touch on your documents can make all the difference. Adding your signature to invoices, quotations, and proposals gives them an authentic and personalized touch, assuring clients of your professionalism. BillCPU makes this process easy by allowing you to upload and place your signature on these essential documents.
We will walk you through the steps to create and add your signature to your invoices, quotations, and proposals using BillCPU CRM.
Why Add a Signature to Your Documents?
A signature serves several important functions in business documents:
- Authenticity: It confirms that the document is legitimate and issued by you.
- Trust: Clients feel more confident when they see a signature, knowing it’s coming from a verified source.
- Professionalism: Signed invoices, quotations, and proposals reflect a well-organized and serious business.
Steps to Add Your Signature in BillCPU
1. Create Your Signature
Before you upload your signature, you need to create one in a format that can be uploaded. Here are two simple ways to do it:
Option 1: Sign on Paper and Digitize
- Take a clean sheet of white paper and sign your name using a black pen.
- Scan or take a clear picture of the signature using your smartphone or a scanner.
- Use a free online tool like remove.bg to remove the background from the image. This will leave you with a clean signature in image format (PNG or JPG), ready to upload.
Option 2: Create a Digital Signature
- Use an online tool like Signwell to create a digital version of your signature.
- Download the signature in an image format (PNG, JPG).
2. Upload Your Signature in BillCPU
Now that you have your signature image, it’s time to upload it in the BillCPU platform.
- Log in to your BillCPU CRM admin account.
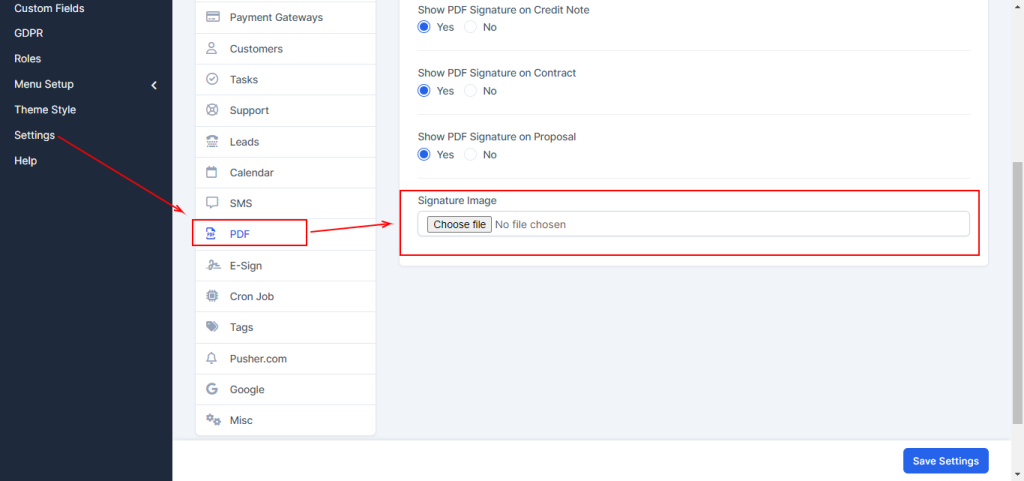
- Navigate to Setup: Go to the side menu, and click on Setup.
- Go to Settings: Once inside the setup area, find Settings and click on it.
- Select PDF Settings: Under settings, find the PDF section.
- Upload Your Signature: Look for the Signature Tab and click on it. Here, you will find an option to upload your signature in image format. Select the image you created and upload it.
- Save Changes: Make sure to click Save to apply your signature to your documents.

3. Where Will Your Signature Appear?
Once uploaded, your signature will automatically be applied to the following documents:
- Invoices: Your signature will appear at the bottom of every invoice you generate, giving it a personal touch.
- Quotations: When sending out quotes to potential clients, your signature will help them take your offer seriously.
- Proposals: Adding your signature to business proposals ensures they are formal and ready for review by your clients.


